
By the HMNDP Editorial Team, independent reporting on lawn care, landscaping, and pollinator habitat.
Last reviewed: June 2026
What a bee watering station is
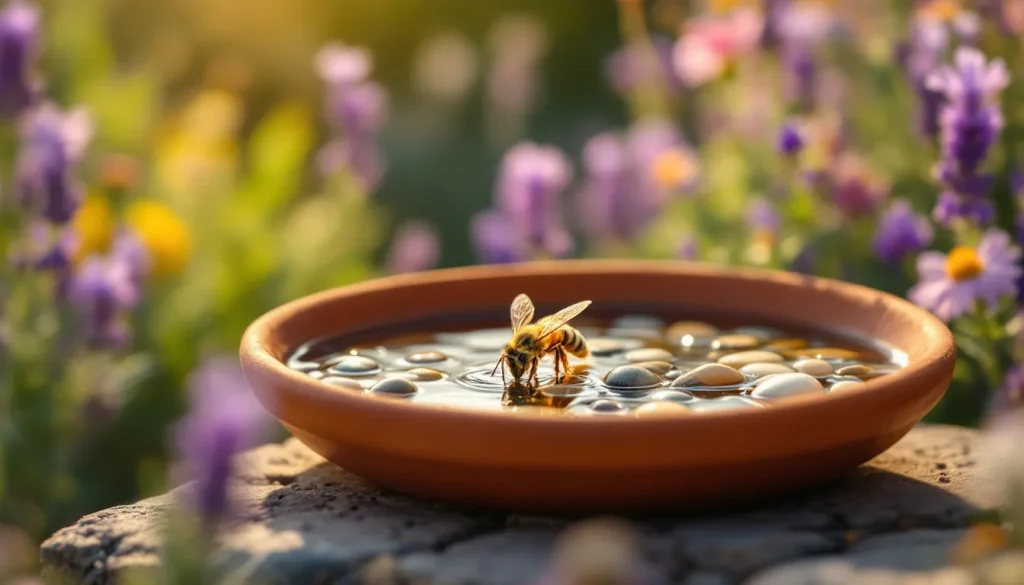
A bee watering station is a shallow water source with safe landing surfaces (marbles, pebbles, corks, or twigs) that let bees drink without drowning. Bees cannot swim and sink fast in open water. The station gives them a dry perch just above the waterline so honeybees and native bees can sip safely on hot days.
It is one of the cheapest habitat features you can add to a yard, often costing under $10 with materials you already own. The design matters more than the price. A deep bowl of clear water kills bees; a shallow dish packed with perches saves them.
Why bees need water
Bees need water for three jobs: cooling the hive, diluting stored honey to feed larvae, and staying hydrated during hot, dry stretches. On days above 95F, honeybee colonies send out dedicated water-forager bees that spread droplets inside the hive and fan their wings, running an evaporative cooler that holds the brood nest near 95F.
A single strong honeybee colony can collect several liters of water per week in summer. Without a clean local source, foragers drift to pool edges, pet bowls, hummingbird feeders, and birdbaths, where many drown or pick up chemicals. A dedicated station keeps them off riskier water.
The three functional parts of a bee watering station
Every working station has three parts: a reservoir that holds the water, a waterway or wicking surface that stays damp, and a shallow basin where bees actually land and drink. Get all three and the station works. Skip the wicking surface and it dries out between refills; skip the shallow basin and bees drown.
| Part | What it does | Common materials |
|---|---|---|
| Reservoir | Stores water so the basin refills as it evaporates | Jar, bottle, hidden lower bowl |
| Waterway / wicking surface | Stays damp and gives grip; can be moving water to deter mosquitoes | Cloth, rope, sloped stone, cork |
| Shallow basin | Holds a thin film of water with perches at the surface | Saucer, terracotta dish, bird bath |
How to make a bee watering station (core DIY method)
To make a bee watering station, fill a shallow dish or saucer with water no deeper than half an inch, then crowd the surface with landing materials so bees can stand while they drink. The whole build takes about five minutes and costs almost nothing. Refill it before the water level drops below the perches.
- Pick a shallow, wide dish: a plant saucer, terracotta base, or shallow bird bath.
- Add a single layer of landing material until it breaks the surface.
- Pour in water until the tops of the stones or corks stay dry.
- Set the dish in a findable spot near flowers (see placement below).
- Check daily in summer and top up so perches never fully submerge.
Good landing and perch materials include marbles, pebbles, river stones, wine corks, glass beads, twigs, and small pieces of floating wood or bark. Corks and untreated wood float and self-adjust as the water level changes, which makes them forgiving choices for beginners.
Cheap and upcycled container options
You do not need a special product. A plant saucer, a terracotta dish, or an inverted-jar chicken waterer all make a working bee watering station for a few dollars. The best budget option is whatever holds a shallow, stable film of water and resists tipping in wind. Below are proven low-cost setups and their trade-offs.
| Container | Approx. cost | Notes |
|---|---|---|
| Plastic or clay plant saucer + pebbles | $2 to $6 | Widest, most stable; easiest to clean |
| Terracotta pot dish | $3 to $8 | Porous rim wicks water; heavy enough not to blow over |
| Upcycled shallow bowl + marbles | $0 | Free from the cupboard; watch depth |
| Poultry/hummingbird-style gravity feeder | Under $15 | Auto-refills the basin; still needs perches and cleaning |
Where to place a bee watering station in your garden
Place a bee watering station within roughly 10 to 20 feet of blooming, pollinator-friendly plants, on the ground or a low stable surface, in morning sun with afternoon shade. Bees find water by sight and scent, so nearness to flowers they already visit does most of the recruiting. A stone or slope for basking helps them warm up on cool mornings.
Keep it away from heavy foot traffic, mowers, and pet bowls. If you are still shaping the yard, a level, well-drained corner works best; our guides on how to level a yard and filling bare spots in a lawn help you create a stable planting bed nearby. Avoid soggy low spots; if drainage is poor, a French drain keeps the area from turning into standing swamp.
Maintenance and safety: the part most guides skip
Maintenance decides whether a bee watering station helps bees or harms them. Standing water breeds mosquitoes within a week, algae and biofilm can spread bee disease, and the wrong water or additives do real damage. The rules below are what actually separate a healthy station from a hazard, and almost no walkthrough covers them.
Preventing mosquitoes
Yes, a neglected station can breed mosquitoes. Mosquito eggs hatch and reach biting adults in about 8 to 10 days in warm weather, so refresh the water every 2 to 3 days to break that cycle before larvae mature. Dumping and refilling is enough. For hands-off control, use a gravity feeder or a small solar fountain that keeps the surface moving, since mosquitoes avoid moving water. Never add insecticide or mosquito dunks to water bees drink.
Cleaning cadence and method
Scrub the basin every 3 to 7 days in summer, more often in heat. Empty it, wipe the algae and slippery biofilm off with a stiff brush, rinse well, and refill. Roughly once a month, disinfect with a dilute unscented bleach solution (about 1 tablespoon per gallon), then rinse thoroughly and let it dry before refilling. Biofilm is where waterborne bee pathogens accumulate, so cleaning is disease control, not cosmetics.
Water source and additives
Plain water is best. Let chlorinated tap water sit uncovered for 24 hours so the chlorine off-gasses, or use rainwater; skip softened water, which is high in sodium. Do not add sugar or honey: it ferments, spreads bee diseases like American foulbrood, and lures wasps and robbing. A pinch of sea salt or a nearby patch of damp, mineral-rich soil is the only supplement bees genuinely seek, and even that is optional. If you also amend beds nearby, our note on adjusting soil chemistry explains why what you add to the ground matters too.
Native bees, honeybees, and seasonal use
Not all bees drink alike, and the calendar matters. Honeybees forage water in large numbers and range far; most native bees (mason bees, bumblebees, sweat bees) drink less and stay closer to their nests, so smaller, low, ground-level basins with plenty of shallow edges suit them better. Offer both wide and small perch surfaces to serve the whole range.
Run the station hardest from late spring through the hottest, driest weeks, roughly June through September in most of the US, when natural puddles vanish and demand peaks. In winter, honeybees still need occasional water on mild days above 50F, so a small refreshed source helps, but you can scale back or pause during hard freezes when the water simply ices over.
DIY versus buying a ready-made bee bath
A DIY station wins on cost; a bought metal or ceramic bee bath wins on looks and durability. Ready-made bee baths and pollinator watering dishes on Amazon typically run $15 to $40, and glazed ceramic or powder-coated metal models resist algae and UV better than a plastic saucer. The performance difference is small: any option lives or dies on refills and cleaning.
| Option | Cost | Durability | Best for |
|---|---|---|---|
| DIY saucer + pebbles | $0 to $6 | 1 to 3 seasons (plastic) | Budget, quick start, testing placement |
| Terracotta build | $3 to $8 | Several seasons | Stability and wicking rim |
| Store-bought ceramic/metal bath | $15 to $40 | Many seasons | Looks, algae resistance, gifts |
The honest verdict: start DIY for a few dollars this week, learn where your bees actually gather, and only upgrade to a bought bath if you want a longer-lasting piece in a visible spot.
Frequently Asked Questions
How do you make a bee watering station?
Fill a shallow dish or plant saucer with water no deeper than half an inch, then add a single layer of landing materials (pebbles, marbles, corks, or twigs) until they break the surface. Pour water so the perch tops stay dry, set it near flowers, and top it up daily in summer. Total time is about five minutes.
What do you put in a bee watering station so bees don’t drown?
Add landing and perch materials that break the water surface: marbles, river pebbles, stones, wine corks, glass beads, twigs, or floating wood and bark. Bees cannot swim, so they need a dry foothold at the waterline. Corks and untreated wood float and adjust as the level drops, making them forgiving. Crowd the surface so no bee has to reach across open water.
Why do bees need a watering station?
Bees use water to cool the hive by evaporation, to dilute stored honey for feeding larvae, and to stay hydrated in hot, dry weather. A single colony can gather several liters weekly in summer. Without a safe local source, foragers drown in pools or pick up chemicals from treated water. A dedicated station keeps them safe and off riskier water.
Where should I place a bee watering station in my garden?
Set it within about 10 to 20 feet of blooming pollinator plants, on the ground or a low, stable surface, in morning sun with afternoon shade. Bees locate water by sight and scent, so nearness to flowers they already visit recruits them fastest. Keep it away from foot traffic, mowers, and pet bowls, and avoid soggy, poorly drained spots.
How often should I clean and refill a bee watering station?
Refresh the water every 2 to 3 days in summer to stop mosquitoes and evaporation, and top it up daily during heat waves so perches never fully submerge. Scrub the basin every 3 to 7 days to remove algae and biofilm, and disinfect monthly with a dilute bleach rinse (about 1 tablespoon per gallon), rinsing thoroughly before refilling.
Will a bee watering station attract mosquitoes, and how do I prevent it?
A neglected station can breed mosquitoes, which reach biting adults in about 8 to 10 days in warm weather. Prevent it by dumping and refilling every 2 to 3 days to break the cycle before larvae mature. For hands-off control, use a small solar fountain or gravity feeder so the surface moves. Never add insecticide or mosquito dunks to water bees drink.
Should you put sugar or salt in bee water?
Do not add sugar or honey. It ferments, spreads bee diseases such as American foulbrood, and attracts wasps and robbing bees. Plain, dechlorinated water is best. A tiny pinch of sea salt or access to nearby damp, mineral-rich soil is the only supplement bees actively seek, and even that is optional. Skip softened water, which carries too much sodium.
Can I buy a bee watering station on Amazon instead of making one?
Yes. Ready-made ceramic and metal bee baths and pollinator watering dishes on Amazon typically cost $15 to $40 and resist algae and UV better than a plastic saucer. Performance is close to a DIY build, though, since both depend on regular refills and cleaning. A practical path is to start with a cheap DIY dish, learn where bees gather, then upgrade if you want.