By HMNDP Editorial Team, independent reporting on lawn care, landscaping, water, and the green-industry business.
Last reviewed: June 2026
What a drip irrigation kit is, and why it works
A drip irrigation kit is a packaged low-pressure, low-volume watering system that delivers water slowly at each plant’s root zone instead of spraying it over the whole bed. A typical kit includes tubing, emitters (drippers), connectors, stakes, and end caps, and most complete kits add a timer. You connect it to an outdoor faucet and install it yourself in an afternoon.
The point is efficiency. Drip systems apply water at roughly 0.5 to 4 gallons per hour (GPH) per emitter, so water soaks in instead of running off. The EPA WaterSense program estimates drip and micro-irrigation can cut outdoor water use by 20 to 50 percent versus spray sprinklers.
Because drip operates at low pressure (most kits are rated for 15 to 30 PSI), it does not need buried pipe or a plumber. That is the whole appeal for home gardeners: a real automated system without trenching or permits.
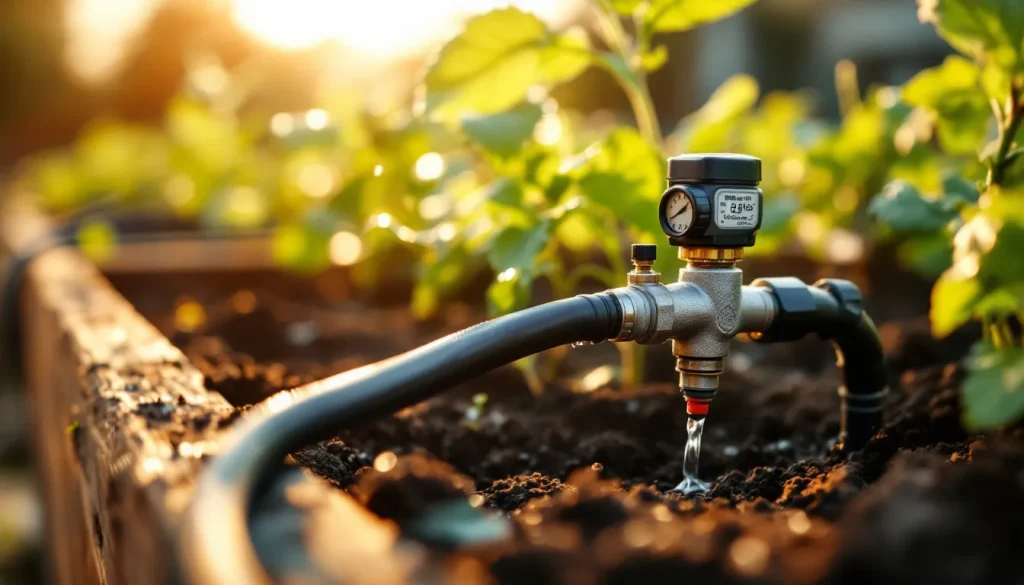
Core components in a drip irrigation kit
Every drip irrigation kit, regardless of brand, is built from the same six part types. Knowing them lets you read any kit’s spec sheet and spot what is missing before you buy.
- Mainline tubing: usually 1/2-inch poly tubing that carries water from the faucet along your beds. This is the backbone.
- Micro/distribution tubing: 1/4-inch tubing that branches off the mainline to individual plants or pots.
- Emitters (drippers): the parts that meter water out, rated in GPH (commonly 0.5, 1, or 2 GPH). Pressure-compensating emitters hold a steady rate across long runs.
- Fittings and connectors: tees, elbows, couplings, and the faucet adapter that links the kit to your hose bib.
- Stakes and end caps: stakes hold tubing and emitters in place; end caps or figure-8 closures seal the line ends.
- Pressure regulator and filter: often bundled in complete kits. The regulator drops household pressure (40 to 80 PSI) to the 15 to 30 PSI drip needs; the filter screen stops grit from clogging emitters.
For a deeper parts breakdown and how each piece fits together, see our guide to how a drip irrigation system works.
Timers and automatic controllers
A timer (controller) turns a drip irrigation kit into a hands-off system by opening and closing the water on a schedule. Most home kits use a battery-powered hose-bib timer that screws onto the faucet between the tap and the kit. Wi-Fi models add app and weather control. A timer is the single component that separates a “complete” kit from a parts-only kit.
For garden drip, a simple mechanical or digital faucet timer that allows daily runs of 15 to 60 minutes is enough. Schedule short, frequent cycles for containers and longer, less frequent cycles for raised beds so water reaches deeper roots.
Comparing named drip irrigation kits
Here is the side-by-side that brand pages will not give you. The table compares widely sold complete and starter kits by price band, what they cover, emitter count, and whether a regulator, filter, and timer are included. Prices are typical 2026 US retail and shift with retailer and pack size.
| Kit | Typical price (2026) | Best for | Emitters / capacity | Regulator + filter | Timer included |
|---|---|---|---|---|---|
| Rain Bird Drip Landscape Kit | $35 to $45 | Landscape beds, shrubs | ~20 emitters, covers up to ~75 sq ft | Yes | No |
| Rain Bird Patio Plant Watering Kit | $30 to $40 | Up to ~20 containers/pots | 20 drippers + 50 ft tubing | Pressure reducer included | Optional add-on |
| Raindrip Automatic Container/Hanging Kit | $30 to $50 | Containers, hanging baskets | ~25 plants | Yes | Yes (analog timer) |
| Orbit Garden Drip Kit | $25 to $40 | Rows, small gardens | ~50 ft tubing, ~12 to 20 emitters | Yes | No |
| Amazon DIY universal kit (e.g. MIXC/KORAM) | $20 to $35 | Raised beds, mixed setups | 50 to 100+ pieces, 50 to 100 ft tubing | Often partial (check listing) | Some bundles |
| Lowe’s / Home Depot store kits | $25 to $60 | In-store buyers, beds + pots | Varies by SKU | Usually yes | Sold separately |
Read the table for what is missing, not just what is included. The two most common gaps are a pressure regulator and a timer. A $25 Amazon kit that omits the regulator can blow emitters off the line on 70 PSI household pressure, so budget another $10 to $20 for a regulator and filter if the listing does not name them.
What size drip irrigation kit do I need? A sizing method
Size a drip irrigation kit by counting emitters first, then tubing, then matching to a kit. Use one emitter per small plant or pot, two to four emitters per large raised bed plant or shrub, and 1/4-inch dripline or 6-inch-spaced emitters along densely planted bed rows. Add up emitters, then add up the linear feet of tubing your layout needs.
Work it in three steps:
- Count emitters. Pots and small plants: 1 emitter each. Tomatoes, peppers, shrubs: 2 to 4 each. Row crops or salad beds: use inline dripline figured at one emitter every 6 to 12 inches.
- Measure tubing. Add the mainline run from the faucet to and between beds, plus 1/4-inch branches to each plant. Add 15 percent for slack and turns.
- Match the kit. Pick a kit whose emitter count and tubing length meet or exceed your totals. Buy one size up rather than exactly to spec, because you will add plants.
Worked examples a buyer can copy:
| Your setup | Emitters needed | Tubing needed | Kit to buy |
|---|---|---|---|
| Three 4×8 ft raised beds | ~6 to 9 (or dripline per bed) | ~60 to 80 ft | Amazon universal 100-ft kit or two Rain Bird landscape kits |
| 15 to 20 patio pots | 15 to 20 | ~50 ft of 1/4-inch | Rain Bird Patio or Raindrip container kit |
| One 100 sq ft landscape bed | ~20 to 30 | ~50 ft | Rain Bird Landscape Kit + extra emitters |
Our step-by-step on how to install drip irrigation walks through laying out these runs in the order that avoids redoing connections.
Flow rate and pressure: will the kit run on your faucet?
A drip irrigation kit works only if total emitter flow stays inside your water source’s supply and the line pressure stays in the drip range. Multiply your emitter count by their GPH to get total demand, keep it under your faucet’s output, and add a 25 to 30 PSI pressure regulator because household pressure (40 to 80 PSI) is too high for drip tubing.
Two numbers decide everything:
- Total GPH: 30 emitters at 1 GPH equals 30 GPH, which a standard hose bib supplies easily. A 1/2-inch poly mainline comfortably carries about 200 to 220 GPH, so home gardens rarely outrun the tubing.
- Max run length: a single 1/2-inch mainline run should stay under about 200 feet, and a 1/4-inch branch under about 25 to 30 feet, or pressure drops and far emitters starve. Pressure-compensating emitters reduce this problem on long beds.
If your spigot shares a well pump or low municipal pressure, test output by timing how long the faucet takes to fill a 5-gallon bucket. Under 30 seconds is plenty for any home drip kit.
DIY install vs buying a complete kit
For most home gardens a complete kit is the better buy, because it bundles a matched regulator, filter, fittings, and timer for $25 to $60 and removes guesswork. Build a DIY kit from bulk parts only when you have an irregular layout, multiple zones, or more than about 150 feet of tubing, where buying components separately costs less and fits better.
A complete kit installs in these steps, no plumbing required:
- Screw the timer, then the filter, then the pressure regulator onto the outdoor faucet (hose bib).
- Attach the faucet adapter and run 1/2-inch mainline tubing to and along your beds.
- Punch holes and insert emitters or 1/4-inch branch tubing at each plant.
- Stake the tubing down and crimp or cap the line ends.
- Run the system, watch for leaks, and set the timer.
DIY makes sense when your needs grow beyond a single zone. Our overview of garden irrigation options compares drip against soaker hose and sprinkler approaches for different garden sizes.
Common mistakes and troubleshooting
Most drip irrigation kit failures trace to four causes: clogged emitters, uneven flow on long runs, missing pressure control, and skipped winterizing. Each has a quick fix, and catching them early keeps a $30 kit working for several seasons.
- Clogged emitters: grit or mineral scale blocks the orifice. Install the inline filter, flush the lines at season start by removing end caps and running water, and choose pressure-compensating emitters in hard-water areas.
- Weak flow at the end of a run: the run is too long or pressure is too low. Shorten branches under 25 feet, split into two mainlines, or switch to pressure-compensating emitters.
- Tubing blown off fittings: household pressure is too high. Add or check the 25 to 30 PSI regulator between the faucet and the kit.
- Winter damage: trapped water freezes and cracks fittings. Before the first hard freeze, remove and store the timer and filter indoors, open the end caps, and drain or blow out the lines. Browse more seasonal how-tos in the HMNDP Learn library.
Frequently Asked Questions
What is a drip irrigation kit and how does it work?
A drip irrigation kit is a packaged low-pressure system that delivers water slowly to each plant’s root zone through tubing and emitters. It connects to an outdoor faucet, runs at 15 to 30 PSI, and applies water at about 0.5 to 4 gallons per hour per emitter. Water soaks in instead of running off, which the EPA WaterSense program links to 20 to 50 percent outdoor water savings.
What comes in a drip irrigation kit?
A drip irrigation kit includes 1/2-inch mainline tubing, 1/4-inch branch tubing, emitters (drippers), fittings and a faucet adapter, stakes, and end caps. Complete kits also bundle a pressure regulator, a filter screen, and often a battery timer. Parts-only or budget kits frequently omit the regulator and timer, so check the listing and add those for about $20 to $30 if missing.
What is the best drip irrigation kit for raised beds?
For multiple raised beds, a 50 to 100-foot universal kit (such as MIXC or KORAM on Amazon) or two Rain Bird Landscape Kits work well because they supply enough tubing to link beds and enough emitters for 6 to 9 plants per bed. Confirm the kit includes a pressure regulator and filter, then add inline dripline for densely planted salad or row beds.
What size drip irrigation kit do I need for my garden?
Count emitters first: one per pot or small plant, two to four per large plant or shrub, or inline dripline every 6 to 12 inches for rows. Add up the tubing feet your layout needs plus 15 percent slack, then buy a kit that meets or exceeds both totals. Buy one size up, because gardens grow. Three 4×8 beds usually need 60 to 80 feet of tubing.
Do I need a pressure regulator or timer with a drip kit?
A pressure regulator is effectively required: household pressure runs 40 to 80 PSI, while drip tubing wants 15 to 30 PSI, so without a 25 to 30 PSI regulator emitters can blow off the line. A timer is optional but recommended, since it automates daily watering. Many complete kits include both; budget kits often do not, so verify before buying.
Can I build a DIY drip irrigation kit, or should I buy a complete one?
Most home gardeners should buy a complete kit, because it bundles a matched regulator, filter, fittings, and timer for $25 to $60 and installs in an afternoon with no plumbing. Build a DIY system from bulk parts when you have an irregular layout, multiple zones, or more than about 150 feet of tubing, where buying components separately costs less and fits the space better.
How many plants or feet of tubing can one drip kit cover?
A typical home kit covers 50 to 100 feet of tubing and 12 to 100 emitters depending on the SKU. Keep a single 1/2-inch mainline run under about 200 feet and each 1/4-inch branch under 25 to 30 feet so far emitters do not starve. A standard hose bib supplies roughly 200 GPH, far more than the 20 to 50 GPH most home gardens draw.